Thursday, November 21, 2013

Romantic Thanksgiving Tablescapes


Happy Thanksgiving! I promised you a couple of Romantic Thanksgiving Tablescapes and here they are. I used things I already had (except the flowers)and only switched a few things to get a different look for the Gold Tablescape.
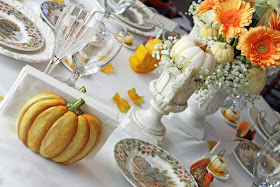
For the first Tablescape I started with a white cotton tablecloth, and added my white plates (that I bought at T.J.Maxx). I sprinkled some gold and moss green silk maple leaves I got last year at the dollar store (it has about 4-5 different colors and I picked the lightest for this tablescape). I wouldn't call this table exactly pastel, but it's darn close :)

Here's a close up of each place-setting.A few years ago I was lucky enough to find two sets (8 total) of these beautiful Myott Factory Queens Thanksgiving Salad plates at Marshalls for $10.00. They still make the pattern and I've started adding to it, but unfortunately, I havn't found that great of a price again. I LOVE this pattern, it mixes florals with a beautiful moss green border and a very Majestic looking turkey. There are a lot of colors to pick up on in this pattern and I love how it changes depending on what you place around it.

I added my monogrammed linen napkins and tied them with moss green organdy ribbon. I had my napkins monogrammed with white because I can always bleach out a stain. It's a decision I've never regretted. I also think there's something very elegant about white on white embroidery.
I always like to have extra (paper)napkins on hand so here they are sitting in a cute ceramic pumpkin holder.
Each place setting has a vintage style paper mache glittered turkey placecard. I've been collecting Teena Flanner Turkeys for years and I just love the vintage look and feel of them. They also have a mini white pumpkin candle sitting on a little plate, both the the plates and the silk leaves are from the dollar store. The candles were from my local Safeway store. Since we eat by candlelight, I wanted a little plate for the candles to sit on.
In case you can't tell, I love white pumpkins. This little bowl serves the cranberry sauce. Whenever I find a white pumpkin at a good price whether it's a candle, a dish, or an actual pumpkin, they just seem to jump into my cart ;)

In case you missed it, I have a tutorial for both of these centerpieces. It's the last post so just keep scrolling.
I wanted to show you what I did with my centerpiece once the flowers were spent. I transferred the gypsophyllia (babies breath) into a small lined basket and nestled the pumpkins (on skewers) into the same basket. I used the same ribbon to make a bow on the handle. This arrangement will easily last another 2 weeks.
In this tablescape, I used white pumpkin candles but I wanted to show how you can easily use a different color. Here is the same pillar candle holders with dark russet orange pumpkin candles. These candles are from my local Safeway store (Debi Lilly) and come in about 4 sizes.
Here's the white pumpkin candles I used for both tablescapes, I just love how these turned out. 
If you love some sparkle with your romance, here is a gold Thanksgiving tablescape. I bought these beautiful gold table-squares years ago on ebay for $7.00 each. We had a Renaissance  masquerade ball theme for my daughters 16th birthday and I've used them more than I ever thought I would. A few years ago I ordered more in silver for our 25th wedding anniversary party :)

The only things I did different for the gold table was to top the white tablecloth with the gold square and remove the silk leaves.
So I think the moral of this tablescape is that you should never underestimate the impact one or two things can make. The reality is that if you dress your table with things that make you happy, things that you love, you WILL end up with a beautiful tablescape. Don't be afraid to play around with things, and remember that things can take on a new purpose. Those same little plates that are holding candles would make great butter dishes, or sprinkle fresh ground pepper and sea salt on them for salt and pepper cellars. Go ahead and get creative, but most of all..just have fun!  

Sunday, November 17, 2013

Romantic Thanksgiving Centerpiece Tutorials

Okay, so it's not a secret, I'm a romantic, no, I'm a hopeless romantic. I love to be surrounded by beauty and romance, especially during the holidays. So I've come up with a couple of romantic Thanksgiving tablescapes, and a couple of romantic centerpieces for inspiration. 
If you like the centerpieces but prefer a different color scheme for your Thanksgiving table, go ahead, this centerpiece would be beautiful with orange or red roses. Imagine yellow sunflowers, mums, or alstromeria instead of gerberas. It would also be just as lovely with orange mini pumpkins, or even other decorative squash. I used a white urn style vase and two urn style pillar candle holders.


 In the pillar candle holders I used white Pumpkin candles because at our house we have Thanksgiving dinner as the sun sets and we love to have candlelight on the table. This has two advantages, the first that I don't have to rush Thanksgiving day to get dinner on early, and two, it's so beautiful to sit down to a candlelit table and listen to Christmas Carols over dinner ( I told you I was hopeless). So use the vase and pillar holders you have, or use this as an excuse to buy some that really touch your soul. 
What your going to need
(I purchased all my flowers at my local grocery store)
One dozen long stem roses- I used a pale pink-peach
One bunch of Gerbera Daisies, sunflowers, alstromeria, or mums 
One bunch of Gypsopholia (babies breath)
5-6 mini pumpkins
One medium size vase
1/2 block fresh floral foam (trim this to fit tightly into your vase, you want it to feel wedged in). Floral foam is easily trimmed with a knife.
5-6 bamboo skewers
One yard of ribbon- I used a 1 inch organdy pale yellow
2 pillar candle holders
2 pumpkin shaped candles that will fit in the pillar candle holder or
2 small pumpkins or decorative squash
Make sure you completely soak your floral foam and place floral preservative in the water surrounding the foam.
Tuck in short, about 3 inch, sprigs of gypsopholia around the pumpkin base until you get the desired effect. That's it, your done! I just loved how these turned out, how about you?
For the floral Centerpiece poke 3 inch sprigs around the entire edge of the vase, into the foam,  until you can no longer see the floral foam. You don't have to do this in the center since other flowers will be going there. 
Poke the pointy end of the bamboo skewer into the bottom of the mini pumpkin and trim the skewer to 6 inches. Place the pumpkins evenly into the outside of the foam, gently tucked into the gypsopholia.
Trim the Gerbera daisies so that they sit at a comfortable height above the pumpkins. You don't want the pumpkins to get hidden under the daisies. Your going to place the daisies inside of the gypsopholia, but not in the center of the foam (that's reserved for the roses). If you wanted, you could actually stop here and you would have a perfectly lovely centerpiece, it's all up to you. If you did want to stop here you may want to use some gypsophlia to cover any foam that might be showing though.
Take your roses and arrange them in the palm of dominant hand so that they make a nice pomander shape, the center one will be highest and you will gently place the following ones a little lower until they look like the photo above. Trim the bottom of the stems so they are even, and push them into the center of the wet floral foam. Try to do this as soon as possible after trimming the stems.
After looking at both sides of your arrangement (or all sides if your vase is round or square) decide what will be the front. Wrap the ribbon 3-4 times around the rose stems (this will hold them together) tie a pretty bow on the front and you are finished with this lovely centerpiece. Remember to check it everyday and keep it watered. It should last you a week. Mums and alstromeria will have the longest vase life. If the roses fade first, remove them and enjoy several more days of your arrangement. 
I'll be back in a couple of days to show you the tablescape(s) I made for these centerpieces, so I hope you'll come back and take a gander.  Happy Thanksgiving sweet friends.