.

.

Monday, October 21, 2013

Raspberry Wine Poached Pears w/ Maple Wine Reduction Ala Mode


Pure Canadian Maple Syrup  http://www.purecanadamaple.com/  has challenged bloggers to "think outside the griddle". They wanted us to show you some delicious ways to use this wonderful liquid sweet Amber besides "on your pancakes".
I was all over this one, because I love Pure Maple Syrup! It adds a depth and flavor to so many recipes. They also wanted us to show you a way to use the leftovers from our dish in a second recipe. Wait until you see what I've come up with :) I hope you enjoy these two dishes as much as I did. I was inspired by the season and found some beautiful pears at the Farmers Market.


Raspberry Wine Poached Pears with Maple Wine Reduction Ala Mode

Ingredients


  • 4-6 Ripe Bosc or Anjou Pears
  • 1/2 cup Pure Maple Syrup
  • 12 ounces frozen Raspberries, thawed
  • 2 cups of Orange Juice (preferably not from concentrate)
  • 4 cups of Raspberry Wine (this can be substituted with a red fruity wine, or with raspberry juice for a non-alcholic version).
  • 1 quart of Vanilla Ice Cream
  • 6 ounces fresh raspberries
  • 1 ounce of Sliced Almonds
  • Fresh Mint Sprigs for garnish


Instructions
Press thawed raspberries, and any juice in the container,  through a strainer saving all but the seeds, for me this rendered about 1 cup of juice and pulp
strained pulp and juice

In a medium sauce pan place the strained Raspberry pulp and juice, Raspberry Wine, Orange Juice, and Pure Maple Syrup.
Stir ingredients and bring to a boil. Turn the heat down to simmer and place the peeled pears in the simmering sauce.
Peeled Bosc Pears, stems left on

You have several options as how to poach and serve your pears. I love the organic look of the whole pear with the stem left on. To ensure my pears would sit well on the plate, I cut a flat, thin slice from the bottom of each pear (see photo above). I also like the stems left in tact and the pears sliced and fanned out
Pears sliced and fanned

You can save time on poaching by coring and slicing your pears before putting them in the pan, and some people prefer cutting their pears into bite size pieces, the choice is all yours.
If you decide to poach your pears whole they will take about an hour, you want to poach the pears until a knife easily pierces through the pear. In the past I've turned the pears half way through but this time I used a heatproof saucer to set over the pears and this held them gently under the liquid. I think I like this method better, I removed the saucer with tongs quite easily.
Once you've removed the pears take 3 cups of the poaching liquid and boil it down until it has halved in quantity. It will also become thicker. Keep and eye one this you don't want to burn it. After your liquid is reduced, turn off the heat. This took 15-20 minutes for me, stirring occasionally.
To plate your dish, place the pear in the center of the plate. Ladle about 1/2 cup of the reduction sauce over the pear letting the sauce puddle. Scoop the vanilla ice cream (I did 3 half scoops). Garnish with fresh raspberries, sliced almonds and a sprig of fresh mint. 
This dish is easy, sophisticated and just plain delicious,  Bon Appetit!


So you're wondering what I have in store for the leftovers? You're going to love it! How about a Pretty Pink Pear cocktail? 
Place everything except the core and stem into a blender and Voila... this is what you get! A delicious, creamy, and pretty cocktail! You can also get this with a little of the ice cream, the reduction sauce, and a splash of the Raspberry Wine. Cheers!


 I think this is definitely "outside the griddle". I would be proud to server these two recipes to any guests, and I hope you'll give them a try. Check out http://www.purecanadamaple.com/ for more ideas on how to use Canadian Pure Maple syrup, you're in for a sweet surprise ;) 


Sunday, October 20, 2013

Flavor Fusion Spicy Maple Pork Sandwich


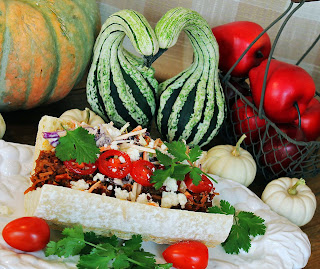
Pure Canadian Maple Syrup  http://www.purecanadamaple.com/ has asked Bloggers to "Think Outside the Griddle" :). So what do you get when you marry Italian Ciabatta Baguettes with Mexican Carnitas, Crema, Queso Fresco, and Asian Sriracha, with Canadian Pure Maple Syrup, and locally grown rainbow slaw? You get a flavor fusion explosion in a sandwich!

 I have to say that my family really, really enjoyed this sandwich, it's sweet, spicy, salty, crunchy, creamy, and tangy all wrapped up in chewy Ciabatta. Both the sweet and spicy can be altered to your taste, it's just a matter of adjusting two ingredients... the pure maple syrup and the Sriracha Hot Chili Sauce. You can turn the volume up or down on either. I'll be sharing what worked for us :) 
This Sandwich consists of three components (don't panic, they're all super easy
  • 1). The Sweet and Spicy Pork Carnitas 
  • 2). The Crunchy Rainbow Slaw
  • 3). The Garnishes

Everything is cooked in one pot, you need one bowl for the slaw, and I'll even give you a great suggestion of what to do with the leftovers (if you have any :)

Click on picture to see it enlarged

  • Ingredients for Sweet & Spicy Carnitas

  • 1) 16 ounces of Cooked Carnitas Fried Pork (I've seen this at both my local grocery store, and at my membership warehouse store)
  • 2). 1 Cup of Roasted bell pepper & Chipotle Sandwich spread, with 2 tablespoons reserved for slaw I saw 3 brands of this at my local grocery store, pick your favorite
  • 3). 1/2 Cup Pure Maple Syrup
  • 4).  2 Tablespoons Sriracha Hot Chili Sauce
  • 5).  1 Italian Ciabatta Baguette
Just starting to brown the meat
Add the Carnitas Meat to a Medium to Large dutch oven or heavy skillet. Brown on medium heat and use two forks to pull the meat apart.
After ingredients have been added
Once the meat has browned, turn the heat to low and add the Pure Maple Syrup, the Sandwich Spread (reserving 2 Tablespoons for the slaw), and the Sriracha Chili Sauce. Stir until combined and warm through. Turn off heat and cover until your ready to assemble the Sandwiches.

Rainbow Slaw Ingredients

  • 1). 12 ounces of Rainbow Slaw Mix found in the fresh produce section
  • 2). 2/3 Cup Crema Mexicana
  • 3). 3 Tablespoons Pure Maple Syrup
  • 4). The reserved 2 Tablespoons Bell Pepper and Chipotle Sandwich Spread
  • 5). 1-2 Tablespoons Sriracha Hot Chili Sauce 1 tablespoon gives it a little kick, 2 gives it a good kick ;)
  • 6). 1/4 teaspoon sea salt
  • 7). 1/4 teaspoon fresh ground peppercorns
Finished Rainbow Slaw
Gently toss all ingredients together, that's it! Don't you love it?
Garnishes
1). Sliced vine ripened tomatoes
2). Queso Fresco Mexican Cheese, crumbled
3). Fresh Cilantro Leaves
To assemble the Sandwiches Cut an 18 inch Ciabatta Baguette into 3-4 sections (this depends on how hungry you are and how many people you need to serve ;)
slice the way you would a hot dog bun, I found leaving the bottom closed made for a much easier eating experience, and less dripping.
Fill your rolls about 1/3 full of the Sweet & Spicy Carnitas
Fill about another 1/3 with the Rainbow Slaw
Top with sliced tomatoes, Queso Fresco, and Cilantro leaves.
Bon Appetit!
So what did I do with the leftovers? Honestly, if I hadn't set some aside there wouldn't have been any :) The next day I used the meat to make a delicious Quesadilla with a side of Rainbow Cole Slaw and it was delicious! 
Don't forget to check out http://www.purecanadamaple.com/ for some wonderfully delicious ideas.